Ever felt the need for knowing who is logging on to your SQL Server and at what time?
Ever felt the need to restrict specific users for certain time-period or firing a trace to track down user activity?
Ever felt like limiting the number of concurrent connections for specific users?
Well, you can do all that now with Logon Triggers.
Logon Trigger allows you to fire a T-SQL, or a stored procedure in response to a LOGON event. You may use logon trigger to audit and control users by tracking login activity, restricting logins from accessing SQL Server, or by limiting the number of sessions for specific logins. Logon Triggers are fired only after a login is successfully authenticated but just before the user session is actually established.
All messages originating from inside the trigger (ex: messages, errors) using the PRINT statement are sent to the SQL Server error log.
NOTE: If the user authentication fails for any reason, then the Logon triggers are not fired.
Below example shows you how you can create a Logon trigger and send a message to SQL Server error log as soon as any user logs in:
Creating a LOGON Trigger
CREATE TRIGGER OPS_LOGON
   ON ALL SERVER
   AFTER LOGON
   AS
   BEGIN
      PRINT SUSER_SNAME() + 'HAS JUST LOGGED IN TO '+UPPER(LTRIM(@@SERVERNAME))+ 'SQL SERVER AT '+LTRIM(GETDATE())
   END
   GO
Limit a Login to 5 Concurrent Sessions
CREATE TRIGGER OPS_LOGON
   ON ALL SERVER WITH EXECUTE AS [Microsoft\SALEEM]
   FOR LOGON
   AS
   BEGIN
      IF ORIGINAL_LOGIN()= [Microsoft\SALEEM] AND
         (SELECT COUNT(*) FROM SYS.DM_EXEC_SESSIONS WHERE IS_USER_PROCESS = 1 AND ORIGINAL_LOGIN_NAME = [Microsoft\SALEEM]) > 5
      ROLLBACK;
      END;
Querying all Server Level Triggers
SELECT * FROM SYS.SERVER_TRIGGERS
GO
Dropping or Deleting OPS_Logon Server Level Trigger
I’m often asked on how to identify the number of CPU’s (physical) and NUMA Nodes (logical CPU’s) from SQL Server. Here’s a quick and easy way to obtain such information.
Run the below query on the instance of SQL Server:
SELECT
   (cpu_count / hyperthread_ratio) AS Number_of_PhysicalCPUs,
   CPU_Count AS Number_of_LogicalCPUs
FROM sys.dm_os_sys_info
Running Antivirus software is critical part of server security but it is also important to understand the impact and effect it has on SQL Server. Imagine this: You’ve installed Anti-Virus on a server that already has SQL Server running, once the server reboots, it is highly likely that the Anti-virus software depending upon the scanning schedule will scan the SQL Server folders and lock SQL Server files before SQL Server can gain access to those files.
When Anti-Virus locks SQL Server files, SQL Server service would not only be able to access those files but there’s a possibility of data corruption since both SQL Server and the Anti-Virus programs are trying to access the files by putting an exclusive lock on them. You must prevent from getting into this situation. (At least on Production server)
Many DBAs would simply exclude .MDF and .LDF files from being scanned by Anti-Virus but thats not enough. There are other important files that can also have an impact on SQL Server.
Here’s the recommended list of items that needs to be excluded from all Anti-virus scans:
SQL Server Data Files (files with extensions like .MDF, .NDF)
SQL Server Log Files (files with extensions like .LDF)
SQL Server Backup files (files with extensions like .BAK and .TRN)
Full-Text Catalog Files
SQL Server Audit Files
SQL Server Query Files (Extensions like .SQL)
Trace/Profiler Files (Extensions like .TRC)
Entire Directory that is holding Analysis Services files that is used for processing Cubes and used for queries that are reading files in to the data folder and the temp folder.
Folder where Analysis Services Backups Files Reside
Exclude SQLServer.Exe file (This is the main database engine file)
ReportingServicesService.Exe
MSMDSrv.exe
Cluster Directory (Usually it is C:\Windows\Cluster) *If your servers are clustered
Cluster Quorum Drive
FILETABLE and Filestream folders
Database Mail file/folders
Taking care of excluding the above files/folders will make sure your Anti-Virus software doesnt interfere with any SQL Server operations. However, keep in mind that you may experience some slowness when running Anti-Virus software on the same server as SQL Server but at-least it will not corrupt your data and will not lock any SQL Server operations.
Ever wondered why SQL Server takes long time to perform below operations?
Create a database
Expand data files for additional growth
Automatic data file growth due to auto-grow settings
Restoring a database, etc.
Today we will be looking in to a powerful and yet not very popular feature that many DBAs can benefit from called SQL-WIFI (Windows Instant File Initialization).
What Happens Internally:
Every time SQL Server needs space for data or log file for any activities listed above, it will grab the required space on the disk and initialize every block of that disk with Zeros before it can use that space for data or log files. It does that to overwrite any existing data left on the disk from previously deleted files.
Imagine if you were to create a 100GB database or a restore a 500 GB database with the default configuration of SQL Server, it will first call the APIs that will overwrite every block on the disk where the file will be restored with 0 before it starts creating or restoring the database on that disk. This can take a long time depending upon how powerful your server is or the resources available on the server.
Here’s an example of creating a 100 GB database called WIFI_TEST. As can be seen from the image below, it took 11 minutes and 43 seconds to create a 100 GB database.
SQL Server WIFI (Windows Instant File Initialization) to the rescue
Initializing blocks to zero every time on an empty disk space is simply a waste of time. To prevent this, SQL Server allows you to initialize data files instantaneously. This means, SQL Server will no longer need to write Zeros on every disk block before using the disk space for above listed operations. This can save tremendous amount of time and improve the performance of above listed operations.
Before using WIFI (Creating a 100 GB database called WIFI_TEST)
After using WIFI (Creating a 100 GB database called WIFI_TEST)
As can be seen from both before and after images, a 100GB database took 11 minutes and 43 seconds and after enabling WIFI, it took only 14 seconds. This test was performed on a x64 i7 4470 CPU @ 3.4 GHz 8 Core Intel machine with 12 GB RAM. That’s a 99+% performance improvement.
Important: Only the data files can be initialized instantaneously and not the log files. Log files will always have to be zero initialized every time before they are being used by SQL Server as SQL Server uses zeros to track the point at which crash recovery is marked as complete.
In order to bypass the zeroing process, you should enable WIFI for SQL Server.
How to Enable WIFI for SQL Server:
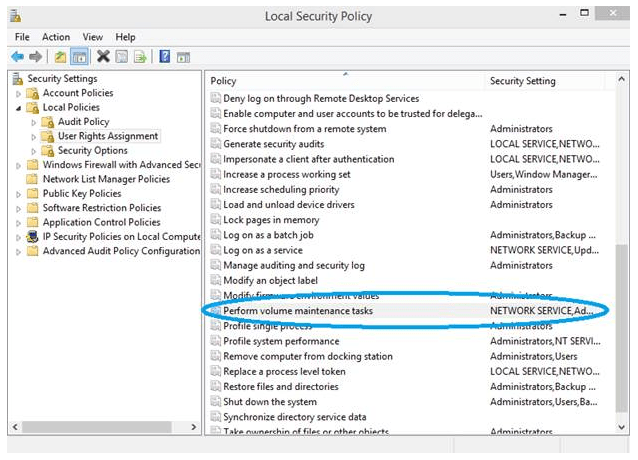
All you need is grant SQL Server service account to PERFORM VOLUME MAINTENANCE TASK local security policy. Any user of the local administrators group can do this.
Here are the steps you can perform:
From Widows Server, Launch Local Security Policy, You can also type SECPOL.MSC and it will launch local security policy window.
From Local Security Policy, Expand Local Policies
Click on User Rights Assignment
From the right pane, double click perform volume maintenance tasks and add the account you are using to run SQL Server service and close the Window
Restart SQL Server Service
NOTE: WIFI is not available for databases that have TDE enabled.
Security Implication: There is however a security implication of Using Instant File Initialization. Without zeroing out the database files (I.e. by using WIFI), someone could copy the DB files (or take a backup of the database), and examine the data in the un-formatted pages to read the data that had previously been on that region of the disks. In that way they could gain access to data which they have no rights to, in the form of previously deleted files.
The best practice is to weigh the benefits and risks of Windows Instant File Initialization before it is implemented. However, if you are implementing it in a properly controlled environment, you’ll notice a huge performance increase for your database file operations.
We use EXEC or EXECUTE command almost every day of our database life. Its a command that allows us execute Stored Procedures (extended, system, user, CLR, etc.) and Functions. However, EXEC command also has a powerful feature that allows you to run any command remotely. Not many developers/DBA’s are aware of this feature. Historically, EXEC / EXECUTE executed commands locally, meaning if you have a stored procedure, you can only run that on your local instance of SQL Server.
EXEC or EXECUTE statement now supports a parameter called AT which allows you to specify the SQL Server instance at which you plan to execute your command from your local SQL Server instance. To use this feature, you will need to establish a linked server connection from your local SQL Server instance to the remote SQL Server instance.
Lets take an example of using EXEC or EXECUTE:
Step 1 – Setup a Linked Server
EXEC SP_AddLinkedServer 'SQLHAKANI','SQL Server'
Go
Step 2 – Enable Linked Server Connection to allow RPC Calls
Exec SP_ServerOption 'SQLHAKANI','RPC OUT',TRUE
Go
Step 3 – Execute the query on a remote server using EXECUTE
Execute ('Select * from Sys.Databases') AT [SQLHAKANI]
Go
Here’s another example of using EXECUTE
Execute ('Master.[dbo].[SP_HELPDB] ''Execute''') AT [SQLHAKANI]
Go

--Alternatively, you can also execute a parameterized stored procedure
EXECUTE ('SQLOPS.[dbo].[SP_HelpDB] ''MASTER''') AT [SQLHAKANI]
Go


Recent Comments