Backups are extremely important for the continuity of business. Many companies fire their engineers just because they didn’t have proper backups in place.
Wouldn’t it be great if there was a way that DBAs and engineers didn’t have to worry about backups and SQL Server was smart enough to perform the backup based on workload pattern (data changes) or based on some defined recovery interval and the backups are auto-magically stored offsite without having to worry about putting them on tapes and then shipping them.
The SQL Server product team has done an awesome job in delivering this new feature that takes away the headache of managing and maintaining database backups. SQL Server Managed Backup automatically performs backups of your databases and stores them to Windows Azure Blob Storage Service.
SQL Server Managed Backups can be enabled at the database or Instance level. With the database level backup, you can only perform managed backup per database. However, if you enable instance level managed backups then you can perform managed backups for all user databases and for any new future databases. (Note: System databases are not currently supported with Managed backups) SQL Server Managed backups can be used for both on premise and hosted environments (ex: VM).
The good thing about SQL Server Managed Backups is that you do not have to specify the type of backup or frequency of the backup. You only specify the retention period which will take care of determining both the type and frequency of the database backup. You can also use the new backup encryption feature introduced in SQL Server 2014 along with SQL Server Managed Backups.
What is a Retention Period?
The retention period is used by SQL Server Managed Backup to determine what backup files should be retained (or left) in the storage so that you can perform a point-in-time recovery of the database. (Currently supported values for retention are 1 thru 30 days)
Important: Only FULL and LOG backups are currently supported by SQL Server Managed Backups.
Full database backup happens automatically if the following conditions are met:
SQL Server Managed Backup is enabled at the Database or Instance level.
T-log has grown >= 1 GB in size since the last full database backup.
The log chain is broken
T-Log backup file is deleted (by human / system error)
Backup files are overwritten with different backups
T-Log Backup happens automatically if the following conditions are met:
Database has had >=5 MB of T-Log change
It has been >= 2 hours since the last Log backup was taken
Anytime the T-Log backup is lagging behind a full database backup
T-Log backup history is deleted or is not found
Important things to keep in mind:
System databases cannot be backed up using SQL Server Managed Backup
T-SQL and SSMS are both supported for performing SQL Server Managed Backup
Only Windows Azure Blob Storage Service is currently supported as backup storage option
Backup size of the database cannot exceed 1 TB in size currently. (you can use backup compression to reduce the backup size)
Databases must be in either FULL or BULK-LOGGED Recovery model. SQL Server Managed Backup doesnt support databases with Simple Recovery model.
Enabling SQL Server Managed Backup at Instance level enables managed backups for new databases but doesnt enable that for existing databases. You must configure each databases specifically.
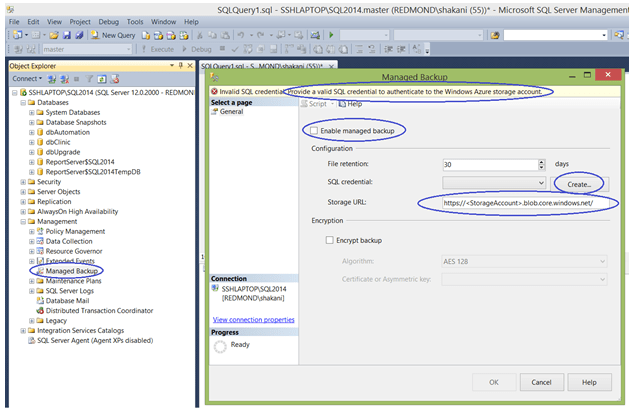
A Windows Azure storage account and a SQL Credential that stores the authentication information to the storage account should both be created before configuring SQL Server Managed Backup to Windows Azure.
Lets now look at an example on how to perform SQL Server Managed Backup:
Enable Instance Level Managed Backup
-- To Enable instance level managed backup
EXEC smart_admin.sp_set_instance_backup
   @retention_days=30
   ,@credential_name='dbClinictoURL'
   ,@encryption_algorithm ='AES_128'
   ,@encryptor_type= 'Certificate'
   ,@encryptor_name='dbClinicBackupCert'
   ,@enable_backup=1
Go

-- To Disable instance level managed backup
EXEC smart_admin.sp_set_instance_backup
   @enable_backup=0;
Let’s now look at enabling database level managed backup
By default, when a query is executed in SQL Server, it compiles and generates an execution plan for that query and stores that plan in the plan cache. Now if this happens to be a one-off/ad-hoc query that will never be run again, then the newly generated plan is wasted and its space that is being used in the plan cache is also wasted. This means, the buffer pool now contains compiled plan of queries that will never be executed.
Now imagine if you have hundreds of ad-hoc queries like this?
SQL Server introduced a new server level setting called Optimize for Ad Hoc Workload which helps address this issue. This setting improves the efficiency of plan cache for one-off/ad hoc queries/batches or workloads. Once you enable this option it changes the behavior of storing the compiled plan in the plan cache. Internally, when the query is executed the first time, the database engine stores query hash in the plan cache which is very small in size compared to the compiled plan.
However, the second time the same query is executed, the database engine checks and recognizes that the query hash exists for the ad-hoc workload and it goes ahead with creating a full compiled plan for that query and stores is in the plan cache by removing the query hash. All subsequent execution of this query will use the plan from the plan cache.
Enabling Optimize for Ad Hoc Workload setting prevents buffer pool from occupying space for unwanted plans that will never be used.
Important things to keep in mind:
You should enable this option when your server has more one-off or Ad Hoc requests.
This prevents plan cache pollution by ad-hoc workloads whose plans will never be used again.
Since it stores the complete plan during the second run, expect a small delay during second execution of the query/batch since the engine will need to generate full plan, remove query hash value from the planned cache and store the full new plan in the plan cache.
Enabling this option, helps save plan cache memory in buffer pool.
You can also use the below stored procedure to identify if your server has heavy ad-hoc workload or not.
Let’s now take a look at how to check if enabling Ad-Hoc workload setting would benefit your server or not:
Create Procedure SQLOPS_AdHocWorkload as
Set NOCOUNT ON
--Author: Saleem Hakani (http://sqlcommunity.com)
--This procedure allows you to check if your server workload can benefit from "Optimize for Ad Hoc Workload" Server Setting.
DECLARE @AdHocWorkloadSize decimal (14,2),
        @TotalSizeInMB decimal (14,2),
        @AdHocSetting Varchar(20)

SELECT @AdHocWorkloadSize = SUM(CAST(
(
CASE
   WHEN usecounts = 1 AND LOWER(objtype) = 'adhoc' THEN size_in_bytes
   ELSE 0
END
) as decimal(14,2))) / 1048576,
   @TotalSizeInMB = SUM (CAST (size_in_bytes as decimal (14,2))) / 1048576
   FROM sys.dm_exec_cached_plans

IF @AdHocWorkloadSize > 200 or ((@AdHocWorkloadSize / @TotalSizeInMB) * 100) > 25
Begin
   Select @AdHocSetting='ENABLE'
End
Else
Begin
   Select @AdHocSetting='DO NOT ENABLE'
   Select
      @AdHocSetting as Recommendation,
      @AdHocWorkloadSize as [Single_Plan_Memory_Usage],
      @TotalSizeInMB as [Cache Plan Size_MB],
      CAST((@AdHocWorkloadSize / @TotalSizeInMB) * 100 as decimal(14,2)) as [%_of_Single_Plan_Cache_Used]
End
GO
Remember those days when the database would go in to suspect mode and you had to perform various steps to recover the database by putting the database in the emergency mode and then extracting the data out of that emergency database?
Here’s a flash back on how we used to do in the past:
Enable modifications to system catalogs.
Change the status of the database in SysDatabases system object to 32768
Restart SQL Server services (This would put the database in Emergency mode)
You would then transfer the data from your database in to another database
You no longer have to perform the above tedious process anymore as Microsoft has made the process much simpler
SQL Server no longer allows making any changes to the system tables even by system admins. Making even a slightest change to system objects is restricted. However, there may be situations when you would need to put the database into EMERGENCY mode and export/extract the data out of the corrupt database in to another database and in order to do that, SQL Server now provides a new feature as part of the ALTER DATABASE statement that would enable System Administrators to put the database in to EMERGENCY mode.
Best Practice: It is strongly recommended that you perform regular backups of your database to avoid any data loss.
Putting the database in EMERGENCY mode:
ALTER DATABASE <SQLDB> SET EMERGENCY
GO
Once the database is in emergency mode, you should now export the data from the SQLDB database in to some other database.
Once you have been able to successfully export the database to another DB, you may put the database back to normal state:
ALTER DATABASE SQLDB SET ONLINE
GO
EMERGENCY Mode Creates Missing Log File
One of the feature of EMERGENCY mode is that when you run DBCC CHECKDB on a user database that doesnt have a log file (ex: disk on which log file was residing crashed and cant be recovered), CHECKDB will rebuild the log file automatically for that user database when it is run while the database is in EMERGENCY mode.
Keep the following in mind when putting the database in Emergency mode:
When the database is put in the EMERGENCY mode, it is marked as READ_ONLY and logging is disabled. Only members of SYSADMIN role can set and are allowed to access the database when in emergency mode.
You can verify if the database is in emergency mode or not by examining the STATE and STATE_DESC columns in the sys.databases catalog view or from the STATUS property of the DATABASEPROPERTYEX function.
You may have experienced something similar where the query or a stored procedure performs bad when deployed in the production and the same query / stored procedure works perfectly well in the test or development environment.
Behind the scenes (Query Internals)
It is possible for the query or the stored procedure to behave differently in lower environments than Production if you have not cleaned up the query execution plan cache when performing tests. Internally, when any SQL statement is executed, SQL Server first looks through the procedure cache (by querying SYS.DM_EXEC_CACHED_PLANS) to verify if an existing execution plan for that SQL statement exists or not. If yes, SQL Server re-uses existing plan it finds, which saves the overhead of recompiling the SQL statement. If it cannot find an execution plan, it generates a new execution plan for that query.
What is the best practice?
The best practice for deploying the code in your production environment is to make sure you first test the code in the test environment by removing cached query plans so you know how your stored procedure or queries would perform in “Cold” cache which is almost like reproducing the cache as though SQL Server had just been started.
CAUTION
DO NOT USE THE BELOW COMMANDS IN THE PRODUCTION ENVIRONMENT, AS YOU COULD BE FLUSHING OUT SEVERAL CACHED QUERY EXECUTION PLANS THAT MAY PERFECTLY BE WORKING FINE.
Please use the below commands on the test/development environment to clear out the cached plans for queries/stored procedures.
-- Step 1 - Clear Cached Plan for a specific Query
-- Execute the query you would like to clear the cache for (ex: Customers table)

SELECT * FROM CUSTOMERS
Go
-- Step 2 - Obtain Query Plan Handle
SELECT
   PLAN_HANDLE,
   ST.TEXT
FROM SYS.DM_EXEC_CACHED_PLANS
   CROSS APPLY SYS.DM_EXEC_SQL_TEXT(PLAN_HANDLE) AS ST
   WHERE TEXT LIKE 'SELECT * FROM CUSTOMERS%'
GO
Let’s now take the plan handle and clear the cache:
-- Step 3 - Clean the Cache
DBCC FREEPROCCACHE (<plan_handle>) -- replace this with the plan handle from the above query
Go
How to query all cached plans from local SQL Server instance
--You can use the below query to list all the cached plans from your database
SELECT * FROM SYS.DM_EXEC_CACHED_PLANS
GO

-- You can use the below statement to clear all the cache plans from your database.
DBCC FREEPROCCACHE
GO

-- Clearing all cache plans without logging the messages in error log
DBCC FREEPROCCACHE WITH NO_INFOMSGS
GO
Be careful when clearing all the cache plans as you may be removing a good cache plan as well.
Are your database pages corrupt or damaged? Now you can restore damaged pages without impacting the availability of the database. SQL Server provides an extension to the RESTORE command that can help restore damaged pages from the backups. (Note: Only the portion that is being restored will be unavailable)
Important things to Keep in Mind:
You cannot restore log pages
You cannot restore GAM, SGAM and PFS pages.
You cannot restore Page 0 of all data files (Page 0 is the file boot page)
You cannot restore Page 1:9 (Page 1:9 is a database boot page)
You cannot restore any Full-Text catalog pages
The database you are performing portions of restore on should be using either FULL or BULK-LOGGED recovery model.
You cannot restore pages on read-only file groups
The restore sequence MUST be FULL and then FILE or Filegroup backup.
The page restore requires an unbroken chain of log backups up to the current log file, and must be applied to bring the page up to date with the current log file.
Page restores must be incremental.
You cant perform both database backup and page restores concurrently.
If you had performed backups using multiple devices then you would need the same number of devices during the online PAGE or FILE restore.
Let’s now take a look at an example of restoring certain pages from the backup. For this, you need the file ID and page ID: (PAGE = FileID:PageID). Lets assume you want to restore page numbers 35, 67, 87, 103 with fileID=1 for SQLCOMMUNITY database.
RESTORE DATABASE [SQLCOMMUNITY] PAGE='1:35, 1:67, 1:69, 1:103'
   From SQLCommunity_BackupFile
   With NORECOVERY
Go
Here’s the step-by-step instructions on performing page level restore from a backup:
Step 1: First identify the damaged page id from Error logs, Event traces, DBCC CheckDB command, WMI Provide, etc. (A CHECKSUM or torn write error returns page ID that can be used for performing PAGE level restore)
Step 2: Start a PAGE level restore with a FULL or FILEGROUP backup that contains the page. (You can use the PAGE clause in the RESTORE DATABASE command and specify all the PAGE IDs of all the pages to be restored. (You can only restore 1000 pages per one RESTORE command)
Step 3: Apply any available differentials required for the pages being restored.
Step 4: Apply any T-Log backups if any.
Step 5: Create a new T-Log backup of the database that includes the last LSN (Log Sequence Number) of the restored pages, that is, the point at which the last restored page is taken offline. The final LSN, which is set as part of the first restore in the sequence, is the redo target LSN. Online roll forward of the file containing the page is able to stop at the redo target LSN.
Step 6: Restore the new log backup that was taken in Step 5. Once the new new T-log backup is restored, the page restore is complete and the pages are now usable.

Recent Comments